Last time, we finished shaping the tsuka (hilt), wrapped a same (rayskin) around it, then left off to let the wet same dry. In the meantime, we've also got the saya (sheath)..."acrylic-ing". This week, we'll get the tsuka ready for mekugi (retention pegs), fittings, and wrapping.

You
may need to do a few more rounds of fitting (and hence take a few more
days) to get the seam on the same right. Did I mention that this project cannot be
completed overnight?
Once you're happy with the fit, slide off
the same, put a thin coat of glue on the tsuka and slide the same back
on. The glue is a little insurance to keep the whole thing - tsukamaki (hilt wrap)
and all - from sliding off the tsuka once everything is complete.
Now is a good time to make sure the emperor node is still on the OMOTE (side facing away from you when you wear your sword) side.
In
my case, the same shrunk a little more than expected in the last round
of fitting. However, the seam is not that outrageous compared to many
examples of nihonto out there, and I've got the same fitting so nice and
tight now that I don't want to mess with it anymore.
Furthermore, the worst of it will be covered by the menuki (little ornamental thingies tucked under the wrap) so this is still quite acceptable.

Once the same is set, it's time to drill the mekugiana, where the mekugi pegs will go through to secure the tsuka to the blade.
If
you have a compatible Dremel, it's worth the extra $70 to get the
workstation (model #220-01). You can do more precise work on your
projects when you don't have to do any hand dremelling (it's a verb
because I say so).
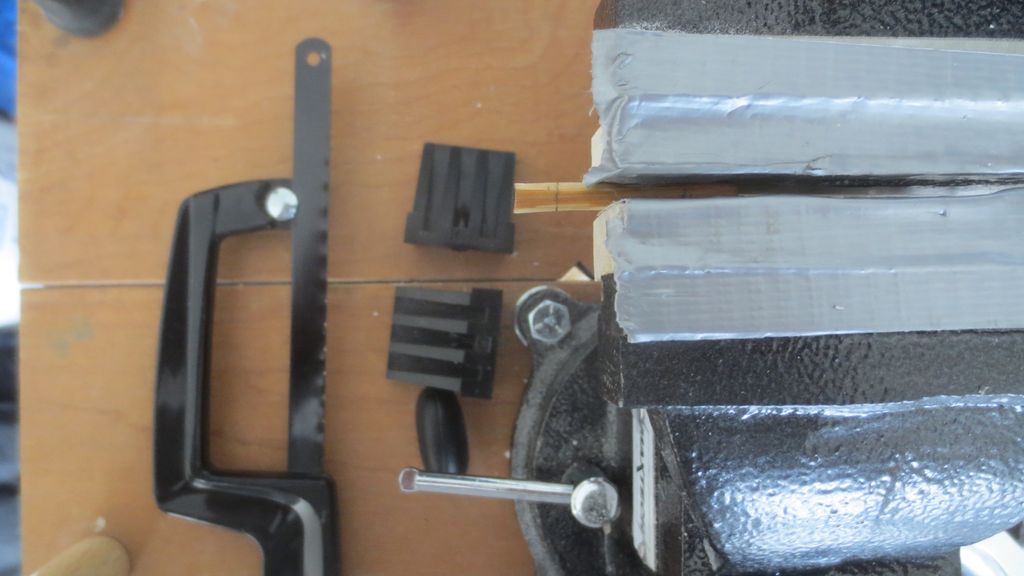
In this case, one of the most useful functions
is to use your Dremel as a drill press. This ensures that the
mekugiana will be straight and of consistent diameter. To this end, I've
secured my workstation next to the vice grip using C-clamps.
Use a 1/8" bit, which just so happens to be the largest bit that will fit in a Dremel. And
no, I am not a Dremel shill, you're free to use whatever works for you,
and they're not paying me very much to recommend them anyway.
Your
mekugiana does not have to be at an angle to hit the diamond-shaped
openings of the tsukamaki on both sides - it can go straight down and
still allow the mekugi to be accessible for removal. In fact, a lot of
nihonto tsuka have straight mekugiana rather than angled.
SAFETY
TIP: If you have your blade secured like mine to a vice grip, be VERY
careful when walking around the tip of the blade (kissaki) lest you impale yourself!
Trust me.

Be sure to completely mount your blade (habaki, tsuba, both seppa, fuchi) to ensure that the mekugiana is lined up when the tsuka and blade are drilled together.
Another
preparation step which I learned from experience (i.e. the hard way)
and hence not pictured is to cover up the drilling area. Paper or
masking tape should work. The aluminum dust kicked up from drilling the
blade stains the same and is a pain to clean - if it can be cleaned at
all.
Aluminum alloy is very tough to drill, and you are likely
drilling through the thickest part of the blade. The Dremel does not
make the most powerful drill in the world, so this will take a while.
OK,
I'll be honest, it's faster to drill for oil out in the ocean. However, it's important to get a
good pilot hole for a proper power drill. If you prefer skip the Dremel and
hand drill the mekugiana right off the bat, good luck because you will need a STEADY
hand.
A couple of things you DON'T want to do is wear out your
Dremel's bearings or burn out its motor. Patiently apply steady but not
excessive pressure when drilling. If it gets too "rumbly", or the
drill seizes up, then you are definitely using too much pressure! If
you feel your Dremel getting hot, it's time to take a break and let it
cool off.
You can also stave off overheating by adding a bit of
oil to the drill bit (NOT a bigass drop!). This makes drilling
smoother, lessens vibration, and reduces friction on the bit.
If
you've been drilling for a while, check to see if the blade is heating
up. If it gets too hot, then you might smell something burning, which
means something very bad is happening to the tsuka.
And for the love of God, if you live in an apartment, do NOT perform this step at 3AM in the morning!!! Trust me.

So what about the mekugi themselves?
It's
best to use proper mekugi made of good quality aged and treated
susudake bamboo, so see if you can reuse the one that originally came with your
iaito if it's still in good condition.
If you need a new
mekugi, try your luck on eBay or elsewhere online. Unfortunately, the
vendor where I bought these is now defunct (not from making bad mekugi!), so I can't provide any specific names anymore.
However,
mekugi happens to be made of the same grade of bamboo used for shinai,
so if you practice kendo, then an old worn-out shinai slat has all the material
you need to make tons of mekugi. Just don't use the business end of the slat since it's probably not strong anymore.
I do NOT recommend using
disposable chopsticks like the ones you get at Panda Express, because
they are neither dense nor durable enough to be safely put on a sword. I
also do NOT recommend eating at any restaurant with the word "Express"
in the name if you want authentic food.

If drilling with the Dremel drill press is taking forever and you're sick of it, at
least make it halfway through the blade for a pilot hole. Now to transition to the power
drill.
Use the next drill bit size up from the 1/8" (9//64" for me).
You'll want to gradually work your way up the drill bit sizes for each
pass so that the hole will properly guide the drill through for a
straight and aligned mekugiana. After all, that was why you went through
all that trouble with the Dremel in the first place, right?
Stop once the mekugiana is at your mekugi size. Or just keep going to make an ass of yourself.
Once you're done, don't forget to trace and drill a hole on the kashira (buttcap) end of the tsuka for the tsukamaki to feed through.

Now comes the fitting of the mekugi.
A
tool that will make your life easier is the mekuginuki, which is a
little brass hammer on one end for hammering in the mekugi, and the
tapered handle on the other end for pushing the mekugi out. These come
with sword maintenance kits, or can be bought individually.
The mekugi should have a nice tight fit, but don't use excessive force. It's a mekuginuki, not Mjolnir!
You
may need to shave the mekugi down to improve your fit. Because of the
fibrous nature of bamboo, this can be easily done with a utility or
Xacto knife, or a razor blade. This also makes it easy to cut yourself
so watch your fingers!
Once you have a good fit, use a pencil to mark where you will cut the excess ends of the mekugi.
Remove and saw off the ends of the mekugi where you marked with your pencil.
This
can be tricky because it's such a small piece, so secure it whichever
way you can before you begin. Or get your dumbass roommate to hold the mekugi with their teeth for you.

Tada!!! It fits!!!
Or it doesn't if you screwed it up!!!

If
you got your same dirty while drilling the mekugiana (hopefully not as
bad as mine in the last pic), clean the same with baking soda. Put on
the mekugi before you begin so that water doesn't run into the tsuka.
The tricky part is to minimize the exposure of the same to water, as you already know what happens to the same once it's soaked.
Apply
dry baking soda to the dirty same, and scrub it with a wet nylon brush.
You can also you an old toothbrush.
Once it's as clean as it gets, QUICKLY rinse the immediate area with water, then dry with a towel and hair dryer RIGHT AWAY.
Here is mine post-cleaning to demonstrate the power of baking soda.
And no, you do not need to use those fancy expensive hairdryers that look like ray guns from a science fiction B-movie porn.
Coming to think of it, Ayako is probably going to kill me once she sees this photo. Oh well.

The hole you just drilled at the end of the tsuka should be positioned correctly so the edges of the kashira itself shouldn't be bearing the tension of the tsukaito (hilt wrap) as it passes through the hole. Otherwise, the edges of the kashira will cut into the tsukaito.
Of course, I screwed this up.
Fortunately, epoxy is my best
friend. I used it to build a "buffer zone" in the kashira hole, which will
relieve the tension of the tsukaito against the sharp edges of the kashira.
Once the epoxy has set, the excess portions of epoxy can be filed away.
That's it for this week while we wait for the epoxy to dry. To be concluded next time, when we'll finally get around to wrapping the damn thing and finishing up the project!
On to Part 5
No comments:
Post a Comment