Sunday, November 29, 2020

Iaito Reborn As A Wakizashi Part 4

Last time, we finished shaping the tsuka (hilt), wrapped a same (rayskin) around it, then left off to let the wet same dry.  In the meantime, we've also got the saya (sheath)..."acrylic-ing".  This week, we'll get the tsuka ready for mekugi (retention pegs), fittings, and wrapping.

You may need to do a few more rounds of fitting (and hence take a few more days) to get the seam on the same right. Did I mention that this project cannot be completed overnight?

Once you're happy with the fit, slide off the same, put a thin coat of glue on the tsuka and slide the same back on. The glue is a little insurance to keep the whole thing - tsukamaki (hilt wrap) and all - from sliding off the tsuka once everything is complete.

Now is a good time to make sure the emperor node is still on the OMOTE (side facing away from you when you wear your sword) side.

In my case, the same shrunk a little more than expected in the last round of fitting. However, the seam is not that outrageous compared to many examples of nihonto out there, and I've got the same fitting so nice and tight now that I don't want to mess with it anymore.

Furthermore, the worst of it will be covered by the menuki (little ornamental thingies tucked under the wrap) so this is still quite acceptable.

Once the same is set, it's time to drill the mekugiana, where the mekugi pegs will go through to secure the tsuka to the blade.

If you have a compatible Dremel, it's worth the extra $70 to get the workstation (model #220-01). You can do more precise work on your projects when you don't have to do any hand dremelling (it's a verb because I say so).

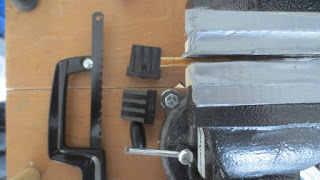
In this case, one of the most useful functions is to use your Dremel as a drill press. This ensures that the mekugiana will be straight and of consistent diameter. To this end, I've secured my workstation next to the vice grip using C-clamps.

Use a 1/8" bit, which just so happens to be the largest bit that will fit in a Dremel.  And no, I am not a Dremel shill, you're free to use whatever works for you, and they're not paying me very much to recommend them anyway.

Your mekugiana does not have to be at an angle to hit the diamond-shaped openings of the tsukamaki on both sides - it can go straight down and still allow the mekugi to be accessible for removal. In fact, a lot of nihonto tsuka have straight mekugiana rather than angled.

SAFETY TIP: If you have your blade secured like mine to a vice grip, be VERY careful when walking around the tip of the blade (kissaki) lest you impale yourself! Trust me.

Be sure to completely mount your blade (habaki, tsuba, both seppa, fuchi) to ensure that the mekugiana is lined up when the tsuka and blade are drilled together.

Another preparation step which I learned from experience (i.e. the hard way) and hence not pictured is to cover up the drilling area. Paper or masking tape should work. The aluminum dust kicked up from drilling the blade stains the same and is a pain to clean - if it can be cleaned at all.

Aluminum alloy is very tough to drill, and you are likely drilling through the thickest part of the blade. The Dremel does not make the most powerful drill in the world, so this will take a while.

OK, I'll be honest, it's faster to drill for oil out in the ocean. However, it's important to get a good pilot hole for a proper power drill. If you prefer skip the Dremel and hand drill the mekugiana right off the bat, good luck because you will need a STEADY hand.

A couple of things you DON'T want to do is wear out your Dremel's bearings or burn out its motor. Patiently apply steady but not excessive pressure when drilling. If it gets too "rumbly", or the drill seizes up, then you are definitely using too much pressure! If you feel your Dremel getting hot, it's time to take a break and let it cool off.

You can also stave off overheating by adding a bit of oil to the drill bit (NOT a bigass drop!). This makes drilling smoother, lessens vibration, and reduces friction on the bit.

If you've been drilling for a while, check to see if the blade is heating up. If it gets too hot, then you might smell something burning, which means something very bad is happening to the tsuka.

And for the love of God, if you live in an apartment, do NOT perform this step at 3AM in the morning!!!  Trust me.

So what about the mekugi themselves?

It's best to use proper mekugi made of good quality aged and treated susudake bamboo, so see if you can reuse the one that originally came with your iaito if it's still in good condition.

If you need a new mekugi, try your luck on eBay or elsewhere online. Unfortunately, the vendor where I bought these is now defunct (not from making bad mekugi!), so I can't provide any specific names anymore.

However, mekugi happens to be made of the same grade of bamboo used for shinai, so if you practice kendo, then an old worn-out shinai slat has all the material you need to make tons of mekugi.  Just don't use the business end of the slat since it's probably not strong anymore.

I do NOT recommend using disposable chopsticks like the ones you get at Panda Express, because they are neither dense nor durable enough to be safely put on a sword. I also do NOT recommend eating at any restaurant with the word "Express" in the name if you want authentic food.

If drilling with the Dremel drill press is taking forever and you're sick of it, at least make it halfway through the blade for a pilot hole. Now to transition to the power drill.

Use the next drill bit size up from the 1/8" (9//64" for me). You'll want to gradually work your way up the drill bit sizes for each pass so that the hole will properly guide the drill through for a straight and aligned mekugiana. After all, that was why you went through all that trouble with the Dremel in the first place, right?

Stop once the mekugiana is at your mekugi size. Or just keep going to make an ass of yourself.

Once you're done, don't forget to trace and drill a hole on the kashira (buttcap) end of the tsuka for the tsukamaki to feed through.

Now comes the fitting of the mekugi.

A tool that will make your life easier is the mekuginuki, which is a little brass hammer on one end for hammering in the mekugi, and the tapered handle on the other end for pushing the mekugi out. These come with sword maintenance kits, or can be bought individually.

The mekugi should have a nice tight fit, but don't use excessive force.  It's a mekuginuki, not Mjolnir!

You may need to shave the mekugi down to improve your fit. Because of the fibrous nature of bamboo, this can be easily done with a utility or Xacto knife, or a razor blade. This also makes it easy to cut yourself so watch your fingers!

Once you have a good fit, use a pencil to mark where you will cut the excess ends of the mekugi.

Remove and saw off the ends of the mekugi where you marked with your pencil.

This can be tricky because it's such a small piece, so secure it whichever way you can before you begin. Or get your dumbass roommate to hold the mekugi with their teeth for you.

Tada!!! It fits!!!

Or it doesn't if you screwed it up!!!

If you got your same dirty while drilling the mekugiana (hopefully not as bad as mine in the last pic), clean the same with baking soda. Put on the mekugi before you begin so that water doesn't run into the tsuka.

The tricky part is to minimize the exposure of the same to water, as you already know what happens to the same once it's soaked.

Apply dry baking soda to the dirty same, and scrub it with a wet nylon brush. You can also you an old toothbrush.

Once it's as clean as it gets, QUICKLY rinse the immediate area with water, then dry with a towel and hair dryer RIGHT AWAY.

Here is mine post-cleaning to demonstrate the power of baking soda.

And no, you do not need to use those fancy expensive hairdryers that look like ray guns from a science fiction B-movie porn.

Coming to think of it, Ayako is probably going to kill me once she sees this photo. Oh well.

The hole you just drilled at the end of the tsuka should be positioned correctly so the edges of the kashira itself shouldn't be bearing the tension of the tsukaito (hilt wrap) as it passes through the hole.  Otherwise, the edges of the kashira will cut into the tsukaito.

Of course, I screwed this up.

Fortunately, epoxy is my best friend. I used it to build a "buffer zone" in the kashira hole, which will relieve the tension of the tsukaito against the sharp edges of the kashira.

Once the epoxy has set, the excess portions of epoxy can be filed away.


That's it for this week while we wait for the epoxy to dry.  To be concluded next time, when we'll finally get around to wrapping the damn thing and finishing up the project!

On to Part 5

Friday, November 13, 2020

Iaito Reborn As A Wakizashi Part 3

So after getting off all the epoxy, glue, and lacquer off my skin from last week , it's time to get the tsuka (hilt) done.

Before you glue the tsuka halves together, keep fitting the nakago (tang) until the proper tightness is achieved. The blade should NOT be easily shaken off and only by using the proper technique for tsuka removal (Google or YouTube it) will the blade come off.

After the glue is set, plane down the tsuka until the fuchi (hilt collar) and kashira (buttcap) fit. Depending on the fittings you choose, there may be a small taper in the tsuka shape.

If you shake the sword and the blade flies off and impales someone, you've chiseled too much. 


By now, you should've already sprayed at least a coat of acrylic enamel on your saya (sheath), which usually takes a week to fully set for the next coat, after which it's a good time to check up on it.  There are likely surface imperfections from runs, as well as from any little dings and scratches on the saya itself.

Use VERY FINE sandpaper to smooth out the coat, and, depending on how deep the dings are, you may not be able to get all of it off. That is fine, just put on several more coats and repeat with the sandpaper and they should disappear.

With a week between each coat, "lacquering" the saya is the most time-consuming and is why it should occur concurrently with work on the other parts of the sword. The more work you put in though, the likelier you will be rewarded with a nice shiny finish.

On to the samegawa (AKA "same"). A good, big fat same will have big fat nodules on the skin surface, as well as a big fat price tag. Since I've already donated all my kidneys to fund this project, I've opted to turn to eBay to procure one of the smaller specimens from China.

In case you have any issues with this:

  1. Given the small size of my project, I can make full use of a smaller same,

  2. Using "authentic" Japanese materials is not an issue here - a stingray is a stingray, and they can freely swim between Japan and China anyway.

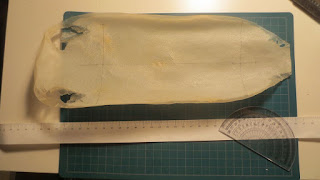
Also note its "bellybutton", which is the large node in the middle called the "emperor node". More on this later.

You will need to measure out and mark how much to cut. However, chances are your same probably came in the mail all curled up to save space, so you will first need to soak it in water until it's soft as vinyl, and then dry it out flat.

Easier said than done, since when it dries, it curls up like cooked squid, except imagine the squid curling up so hard that it crushes your wok into a cannonball.

This is actually a desirable property, as when it curls up against your tsuka, the same will add a considerable amount of structural reinforcement.

One way to dry the same flat is to clamp the same by the edges onto a badminton rack.

An alternate method is to use two stacks of heavy books or C-clamps to pin down the sides - just keep the midsection of the same exposed in order to air dry.

If your same is thin enough, you may be able to cut it when it's dry, otherwise you'll have to cut it when it's soft and wet. You will need good, thick scissors as either way, it will be rather crunchy as you cut the node-ridden same.

The important thing is to only mark your same for cutting when it's DRY. Because same expands when wet and shrinks when dry, marking it while wet will make all your measurements wrong once it shrinks, and your same piece will be too small to use.

Make sure you measure the diameter of your tsuka at BOTH ends, due to the aforementioned taper. Furthermore, it's better to err on the side of caution and cut out a little more than you actually need, than to cut too little and let the poor little stingray die in vain.

Soak your piece of same then wrap it around the tsuka for preliminary fitting. To secure the same onto the tsuka, most people tie tsukamaki around the whole thing, but I found something better laying around the house - reusable ties! To make things go smoother, pre-loop the ties before you begin wrapping.

Make sure the emperor node is on the OMOTE side (the side of the tsuka that faces away from you when you wear the sword, same side as the kurikata). This means the seam formed by the edges of the same piece will be on the URA side (facing you when you wear the sword).

Also, the emperor node doesn't have to be all the way down at the kashira end, but it should be far down enough that it doesn't get in the way of the mekugi or menuki.

This method of wrapping the same around the whole tsuka is called "marugise" . This has the advantage of providing the most strength to your tsuka.

Many katana made outside of Japan and iaito (even the high-end ones!) use the "tanzaku" method, where a wide channel is cut on either side of the tsuka, and panels of same inserted on either side. If you carefully push a part of the tsukamaki aside on your iaito, you'll likely see an example of this.

The latter is cheaper as it uses less same, but it doesn't have the strengthening advantage of the marugise method. However, if the tsuka is well-made, this shouldn't be a problem.

Another good thing about tanzaku besides lower cost is that it makes the most use out of a same, where the smaller pieces would otherwise be discarded.

Once the same is completely dry and won't shrink anymore (give it at least a day), the edges will overlap as expected, since we've cut off a little more than needed.

To make it a better fit, use a ruler and draw a line down the center of the tsuka on the overlapping edge, where the seam should be.

Then, slide the same off the tsuka and cut along the line. If you are able to cut the same dry, this will save you another day of the soak/wrap/dry cycle.

After cutting the same, slide it back on the tsuka, and use the newly cut edge to draw a line on the underlying edge.

Slide the same off, cut the underlying edge along the line, then slide back on again.

This completes round one of preliminary fitting. Although the seam is nicely formed, the same will still be a little loose since it was cut after fitting.

Therefore, slide off and soak the same to begin the next round of fitting.

Once the same has completely dried again, you may need to do some more trimming or fine tuning of the edges with sandpaper.

So you might be wondering why bother with the effort of making the seam seamless when you could just hide the seam along the ha or mune side of the tsuka under the tsukamaki.

Firstly, when you cut with the sword, the ha/mune (sharp/blunt edge of blade) sides of the tsuka take the most stress, so putting the seam along either of those sides would render the same less effective in structurally reinforcing the tsuka. Again, this is not so much an issue if the tsuka is well built if you absolutely don't want to see that seam.

Secondly, to ensure that the emperor node still centers on the omote side, you will have to offset your piece of same when you first cut it out. This means you would need to start with a bigger same - and waste more of it.

If you look at many specimens of nihonto on the internets, you can see a lot of them have the seam on the ura side. This is a sign that the same has been wrapped marugise style.

Unless your tsuka maker is trying to fool you with tanzaku panels to fake the seam.


That's it for this week while we wait for that same to dry.  Next week, I'll continue with the tsuka and get it fitted for mekugi.

On to Part 4

Thursday, November 5, 2020

Iaito Reborn As A Wakizashi Part 2

Okay, so last week, I cut a new nakago (tang) in the broken blade, made some fittings with Art Clay Silver, and got started carving out the saya (sheath).  Seeing how I still have ten each of fingers and toes, and not covered in third degree burns, I've assessed myself as mentally and physically fit to continue with the project.


Now repeat the inletting for the blade on the other half of the saya. For a proper saya, the only part of the blade that should touch the inside of the saya is the mune (unsharp edge at back of blade). The tight fit of the habaki (that collar thingy that helps snug the blade onto the scabbard) takes care of the rest.

Before you glue the halves together, check to make sure the blade has this proper clearance, and that it can slide in and out of the saya without obstruction.


I used Gorilla Wood Glue for the saya because rice, although the traditional choice, is for eating, not gluing.  Especially when you grew up in an Asian family.  C-clamps come in handy (can be bought at a dollar store if you're really poor), but you should also consider one of those ratcheting clamps to the right, because you will really need it for the tsukamaki (hilt wrapping) later on unless you're using leather (more on that later).

You should sandwich your saya halves between two pieces of scrap wood to avoid turning the surface into a moonscape with the C-clamps.  Unless that's the effect you're going for.


To shape the saya, I highly recommend a traditional Japanese plane called a kanna, although a Western plane works fine as well.

Kannas are rather low-tech (you only need to tap with a hammer to adjust), and require a different technique from a Western plane (you pull rather than push). However, you only need to extend the blade less than half a mm and that thing planes through wood like melted butter. This is something you expect from a country known for really sharp things.

You can get a kanna next time you go to Japan at Tokyu Hands, or online. 


Now for the finishing touches before lacquering.

If you find that your plane got a little "greedy" and shaved off too much wood, try rebuilding the lost portion with epoxy and careful use of a wooden Starbucks stir stick. If you feel bad about taking stir sticks from Starbucks, put them back in the condiment station once you're done with them.

Sand the surface until it is nice and even, as little nicks, dents and corners will still show through the lacquer. Since water buffalo horn is impossible to buy here, and what little I managed to get off of eBay is reserved for the koiguchi (cap at the sheath opening), I fashioned a kurikata (knob on the side of the sheath where the cord threads through) out of a scrap piece of wood.

I also recommend a kojiri (end cap on the saya), since the end of the saya can get pretty dinged up. The metal ones are the best, but they are tricky to find and can be a bit pricey, so you can use horn. If you encounter the aforementioned scarcity, then you could probably make an endcap with whatever durable material you can find (or even...epoxy!).  Or just make do with none at all.

And in case you're wondering, I glued on the kojiri before lacquering to ensure its edge seamlessly blends into the saya.


Normally, this is also the time to install the koiguchi. Normally, the koiguchi should "wrap" around the opening of the saya.

In my case, my homemade habaki was so thick and the saya opening so wide that there's no room for the koiguchi, so I had to glue the koiguchi on top of the saya opening rather than around it. Because of my procedural deviations, these steps for me were performed near the end when the saya was almost complete, but I'll put them here in the "normal" order.

In retrospect, I should've installed the koiguchi at this point as well so that the lacquer would have blended seamlessly.

For the normal method, you'll need to first carve a place for the koiguchi around the saya opening. (You'll have to Google for images and diagrams.)

Hopefully you are able to procure a buffalo horn blank from eBay or somewhere.

Start by tracing out the the end of the saya on a piece of paper. Cut out the outline and affix on the buffalo horn with rubber cement or two-sided tape so you can peel it off later.

It would be simpler to just trace out the saya directly on the horn with a sharpie, but good luck seeing what you just traced.

First cut as much as you can with a hacksaw, such as the corners, to save you some work, but don't cut too close.


Use a Dremel to sand the horn to shape (or file if you are Dremelless).

For safety and grip, be sure to wear nitrile-coated work gloves. Unless you like retrieving your work across the room with bloody stumps where your fingertips used to be.

Fit the shape of the horn to the end of the saya.

But before you begin, here's a little brain exercise... What is buffalo horn made of? Keratin! What is hair made of? Keratin! What does it smell like when you subject buffalo horn to lots of friction and heat??!?  Open the window.


Once the outline of the horn is to your satisfaction, drill some holes in the middle of the horn to start off the opening.

If you have it, a multipurpose bit (#561) on the Dremel will literally shave off a lot of work. They can also shave off a lot of your fingers too, so for the love of God, keep those freakin' gloves on!!!  Trust me.  Better yet, use a clamp to hold the horn.

Fine tune the koiguchi opening with files, fitting it not only to the saya but to the habaki of the blade. If you are making the koiguchi my way rather than the normal way, the koiguchi must fit loosely over the habaki; all the tension will be taken up by the wooden part of the saya opening.

Once it is the right fit, bevel the inner edge of the koiguchi opening. Then, smoothen the outer edges with progressively finer grits of sandpaper. Finally, smoothen all edges with the finest grade (#0000) of steel wool. You'll need to polish further if you want the koiguchi to be nice and shiny.

Once the koiguchi is complete, glue it to the end of the saya.


You should start on the next couple of steps right away before starting work on the tsuka (hilt), as they are time-consuming and best performed concurrently with tsuka work if you don't want your project timeline to be needlessly delayed.

Traditional Japanese lacquer (urushi) is very hard to come by and it is also toxic, coming from a tree that wants to kill you.  Since I can't trust myself no to lick my fingers after every coat, I though a can of spray-on lacquer from Home Despot would do the trick.

Big mistake.

The coats took forever to really not dry, and I ended up with a gummy non-Newtonian mess that I had to strip and start over.  Instead, I found acrylic enamel to be vastly superior.  At this point, this project has already vastly departed from traditional and I don't have time to go to Japan for a 20-year apprenticeship.

If you get any runs, exercise damage control by carefully dabbing it out with a paper towel before it forms large sticky beads that take forever to dry and are a huge pain in the ass to sand off.

Once the coat has thoroughly dried, buff down any runs or run remnants with VERY FINE sandpaper (no less than 400 grit, I'd say), and wipe down with a damp cloth/paper towel to get the dust off before applying the next coat.

If it's really windy outside, you're better off postponing the coat rather than risk runs and beading because your spray is blown all over the place.


The other step is to pre-stretch the tsukaito (hilt wrap) for several days to prevent it from loosening after it has wrapped your tsuka.

For me, I'm a huge fan of tsukaito (and other things) made of leather, which is prone to getting loose if not stretched out. Unlike cotton or silk, leather doesn't get unwashably dirty or gummy, yet still retains a good grip.

So unless you actually do want to enhance your grip with a slurry of dead skin cells, ripe sebaceous secretions, and aged perspiration, leather is the way to go if you can find/afford it.

I used eBay for mine, but I don't recommend the cheaper synthetic vinyl (hold a Paul Chen Practical Plus Katana to see what it feels like).

At least for leather, I do NOT recommend more than 1.5L of water for weight. Sadly, this threshold was derived empirically, when my tsukaito snapped and became a huge pain in the ass to repair.

For this, you can either use a STURDY shower curtain bar, or one of those door chin-up bars you buy on your annual New Year resolution to lose weight but will never use for any actual exercise.


Now you can proceed to the tsuka. It's the same deal as the saya, except now you have to be careful about achieving a precisely tight fit. Just DON'T FORGET to put the habaki, tsuba (hanguard), and seppas (spacers) on before you trace it out.  Since you can't fit the fuchi (collar around hilt near the hanguard) at this point, you can try to factor it in, but if you can't it won't be an issue.

If you thought the saya was a pain, chiseling out the tsuka can be a tedious exercise of trial and error, and you may have to further shape the nakago with the file as you go along. Just be glad that the nakago isn't as long as the blade.

Be extra careful when you work the edges first, and if you find you've chiseled out too much, try filling it back in using epoxy shaped by a strip of masking tape.

And yes, I know my Toothless pencil is awesome and no, you may not have it.


That's it for this week's project installment.  Stay tuned next week when we delve more into the tsuka and how to wrap the same (rayskin). 

On to Part 3

Wednesday, October 28, 2020

Iaito Reborn As A Wakizashi Part 1

I've been wanting to put up some project posts here for a while now, so I guess today is the day I finally got off my derrière...

This first project happened out of circumstance, with that circumstance being an individual breaking Ron Plumsteel's iaito, which was resting on the ground, with an errant basketball.  Ron, like the true Buddhist that he is, let it slide. 

It just so happened that I have been shopping for a wakizashi (short sword) version of an iaito to match my katana-length iaito.  Sure, at our school of iaido and at our level, we exclusively use the katana, but let's just say it's for science.  Unfortunately, wakizashi iaito are pretty hard to come by, and the few vendors who do carry them sell them for almost the price of a full katana-length iaito.

This is because fittings are the major variable behind iaito prices; the blades are usually of the same quality material among the different models. Even though less material is used for the blade, saya, and tsuka, the fittings on a wakizashi is not really much different than the katana version, so the price isn't that much cheaper.

Fortunately, no one had the heart to discard the broken blade, and Sensei was nice enough to let me have it when I proposed my project to him (BTW, we all chipped in for a new blade for our Buddhist member.).  Using traditional Japanese techniques like the Dremel, this blade will enter its next life as a wakizashi!

Lastly, my project posts are riddled with Japanese terms.  Although I try to throw in the English translation once in a while for laypeople, I'm too lazy to translate the terms every time, so please Google it, OK?

Here is the blade lying in state. After a suitable period of mourning of no less than 30 days (be sure to tell your boss first), it is time to outline the length of the nakago (tang) with a sharpie. It's also a good time to plan out your tsuka (hilt) length, fittings, # of tsukamaki (hilt wrap) "diamonds", etc. as well.


Cut out the nakago shape using a Dremel cutting wheel or work with a file. 

Remember that you are making a nakago out of the blade itself, so that the end of the nakago will actually be thickest part of the blade.  You do not want this, as having the end of the nakago thicker than the rest will make the blade impossible to slide in and out of the tsuka should the need to disassemble the sword arises.

Therefore, don't forget to reduce the thickness of the nakago, or even introduce a very slight taper towards the end, using a file. Be careful of the angle you are filing, as you'll need to preserve the cross-sectional profile of the nakago as much as possible.

For the parts of the nakago that are still nicely polished, I like to slightly rough it up with the grinder wheel to help the nakago grip the inside of the tsuka. (And I do mean SLIGHTLY, since the inside of the tsuka will get shredded if the nakago is too rough!)

Finally, don't forget to bevel the edges of your newly-made nakago to avoid them cutting into and splitting the wood of the tsuka.


Another thing you do not want to discard is the habaki (that collar thingy that helps snug the blade onto the scabbard). Unfortunately, in my case, the habaki was repurposed for the replacement blade, which is just as well since I wanted a habaki that matches the iaito that I'm using for practice.

Oh wait, that thing's made of pure silver.

For those of you who need a replacement habaki but don't need one out of precious metal, you can find a lot of them for cheap on eBay - antique and new. The beauty of working on an iaito is that you can grind the blade to fit the habaki rather than the other way around!  

Then again, if it's a cheap eBay habaki and not one used by Miyamoto Musashi, it's also possible to shape a habaki to fit a blade, but the size of the habaki has to be correct in the first place

If you're an uncompromising schmuck like me, the only other choice is to make one. Time to open up the old wallet (which is only thick due to membership/point cards and ATM receipts) and dig deep between the sofa cushions for change to order up some Art Clay Silver.  This is easily the most expensive part of this project.

Go figure that my first time working with this stuff, it's for a precise-fitting component. Art Clay Silver can be challenging to work with, because it's either wet like rainy day mud, or dry and crumbly like Play-Doh after leaving it in its container as instructed. There is no happy medium.

Worst of all it SHRINKS, and the shrinkage can vary 8-10%. This variance can be significant for something like a habaki. I used masking tape to add thickness to the blade in order to factor in this shrinkage (better to err on the side of caution and be a little bit generous).


Believe it or not, it took me 8 hours of work and waiting for things to dry to get to this point, and that's not including the time it took to watch and make sense of the instructional Japanese DVD that came with my starter kit. Time to enjoy the fireworks show I so richly deserve.

Go ahead and pick it up with your bare hands. It's only red because of the colour!

Since I'm already working with Art Clay Silver, I might as well make the menuki (those ornament thingies that get wrapped into the hilt). I found a cool one on eBay, but unfortunately it only came as a singleton and I wanted a matching pair. Nothing that a mold made of polymer clay can't fix.

And voilà! Menuki offspring! There will be some loss in detail due to the molding process, but that is acceptable. Using pickling solution to add an antique finish will help bring out whatever details are left.

Moving on to the saya (scabbard). Windsor Plywood, a local vendor, usually carries a good selection of woods by the ft/m for such projects. The traditional wood is honoki, a type of Japanese magnolia which you can only obtain off the internets.

Because my bank account was depleted by the Art Clay Silver, I chose poplar because it is said to be a good approximation and easy to work with.

Not only do you need to trace out the blade to carve out the inside of the saya, but you also need to use the curvature of the blade to trace out the overall shape of the saya.

Oh, and in case you can look closely enough to notice, I know the habaki didn't exactly turn out  to be perfect. But then again, I could very well be the first person to ever fashion a habaki out of Art Clay Silver so cut me some slack!

It helps a lot to first use an Xacto knife to cut out the outline of the blade for the inside of the saya, so that you can chisel it out precisely. The chiseling can be painstaking, but I found it to be easier and less mistake-prone to carefully work the edges first before carving out the main part.

That being said, it is a good investment to buy a proper wood carving chisel, which you can get for less than $30.

And yes, this is why you don't sell your MBA and science textbooks back to the bookstore for a pittance.


That's it for this first installment of my first project post.  Stay tuned next week when I continue working on the saya and get started on the tsuka!

On to Part 2

Tuesday, March 24, 2020

Message from Sensei re Coronavirus (COVID-19)

--------  At This Pandemic Crisis ------  

I hope all members are doing fine !
Since our 2 dojos are suspended for quite while already, most people  must be starting boring to stay indoors.
Good to know, some of them are practicing at home.

We are suppose to go back to regular class on April 7th (Tuesday) at UBC & April 17th (Friday) at Marpole.
But things are still changing everyday.
We still don't know when we can go back to normal......

Anyway until then, stay healthy & see you soon.

☆♪
Hiro Inoue
Sent from my iPod


Tuesday, March 17, 2020

Temporary Dojo Closures due to Coronavirus Disease (COVID-19)

All members,

Please note that due to the current Coronavirus Disease (COVID-19) situation, both dojos are temporarily closed.


UBC Dojo is currently closed until April 6.


Marpole Dojo is currently closed until further notice.

This post will be updated as new information is made available.

For the most up-to-date information, please consult the following links:


Until then, stay safe and see you all when this whole thing is over.